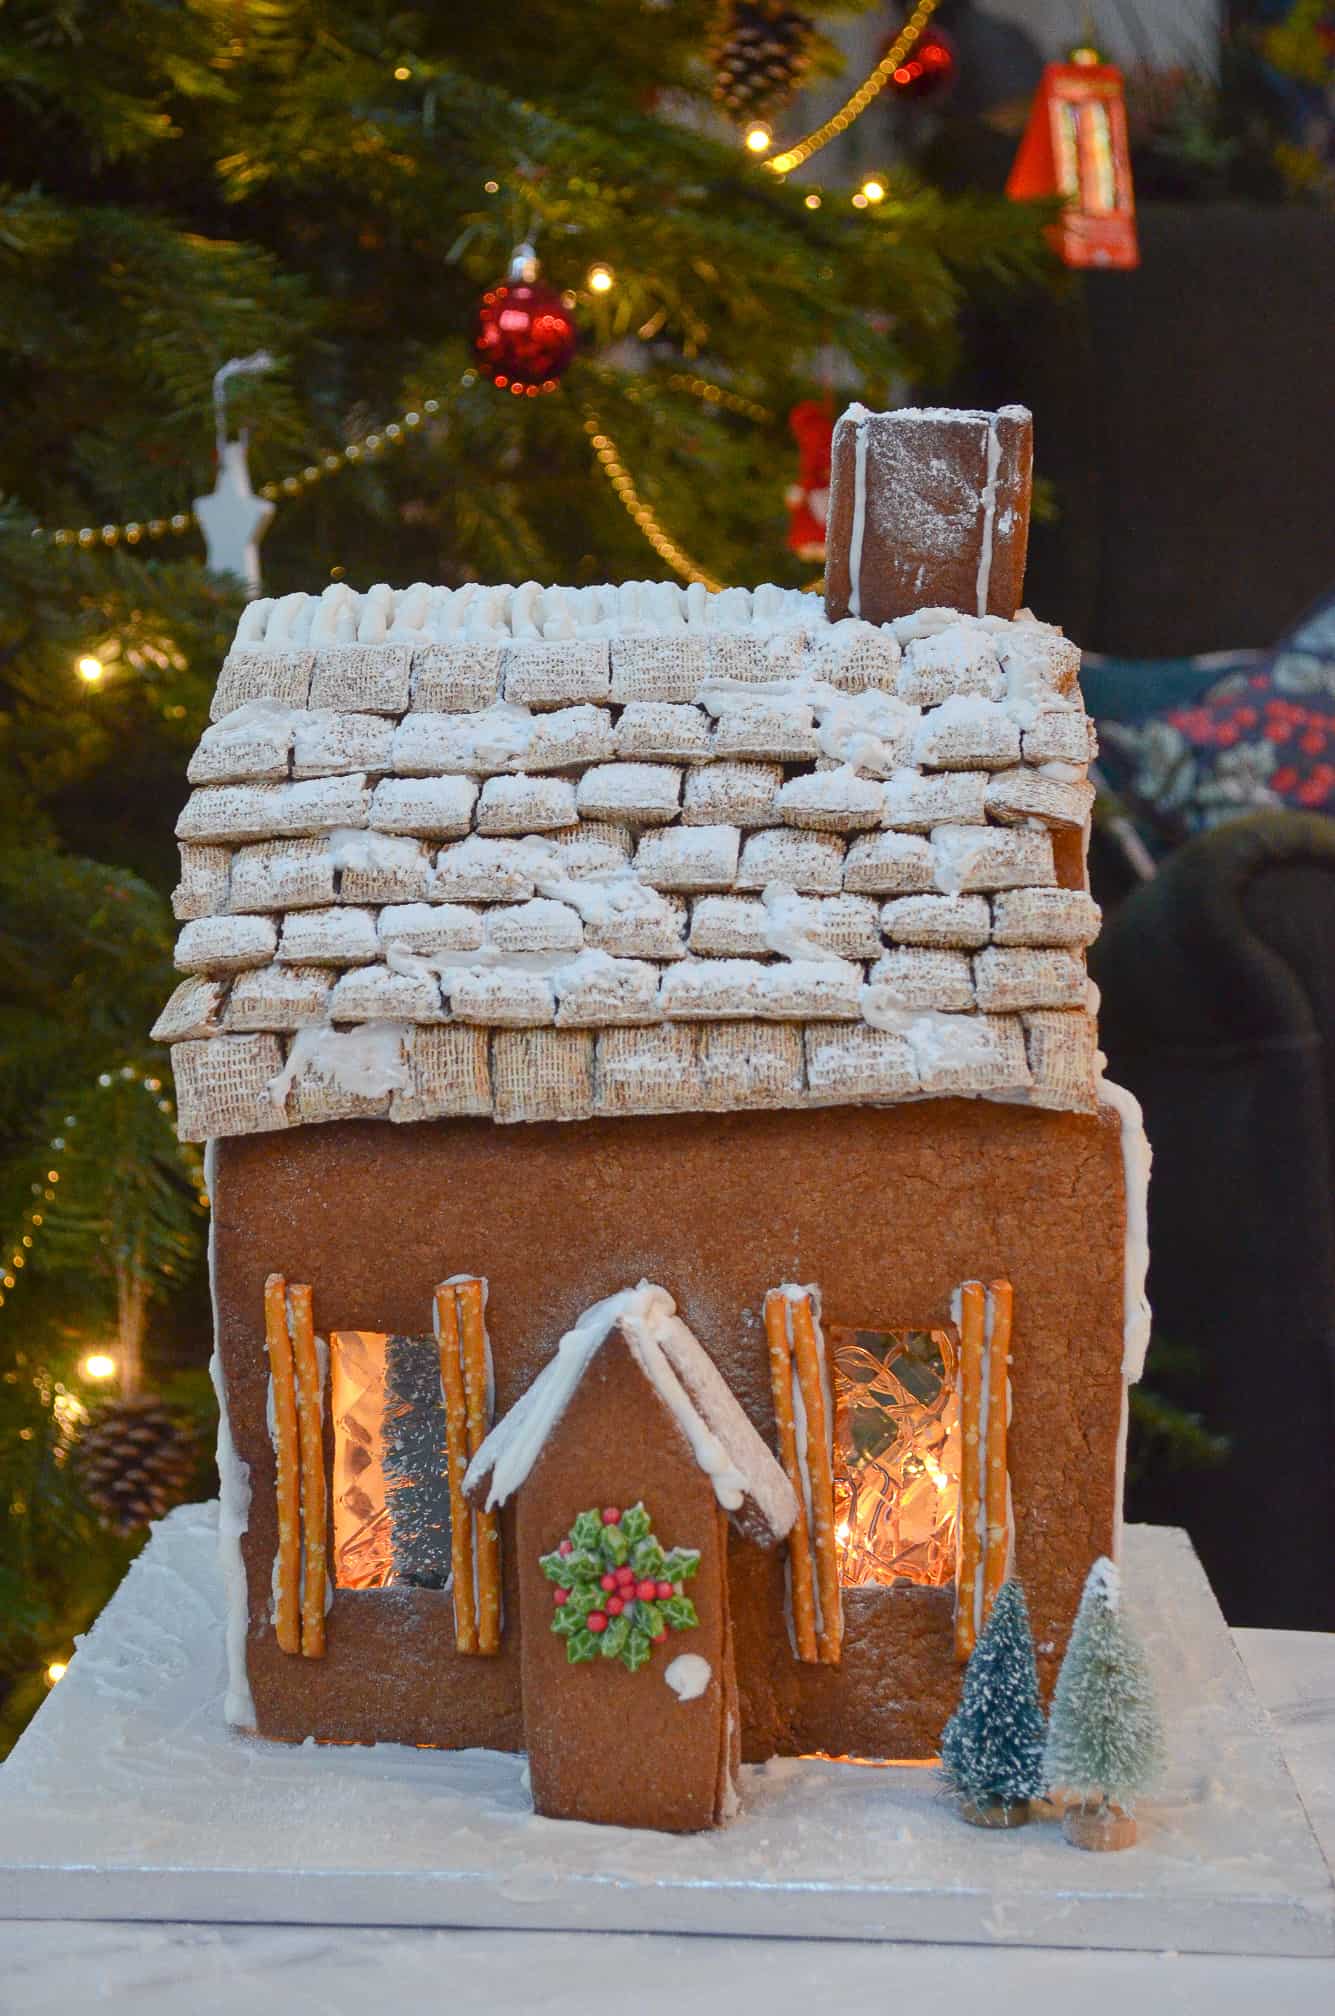
Just in time for the countdown to Christmas, I break down how to make a Christmas gingerbread cottage! It’s delicious, beautiful and so FUN!
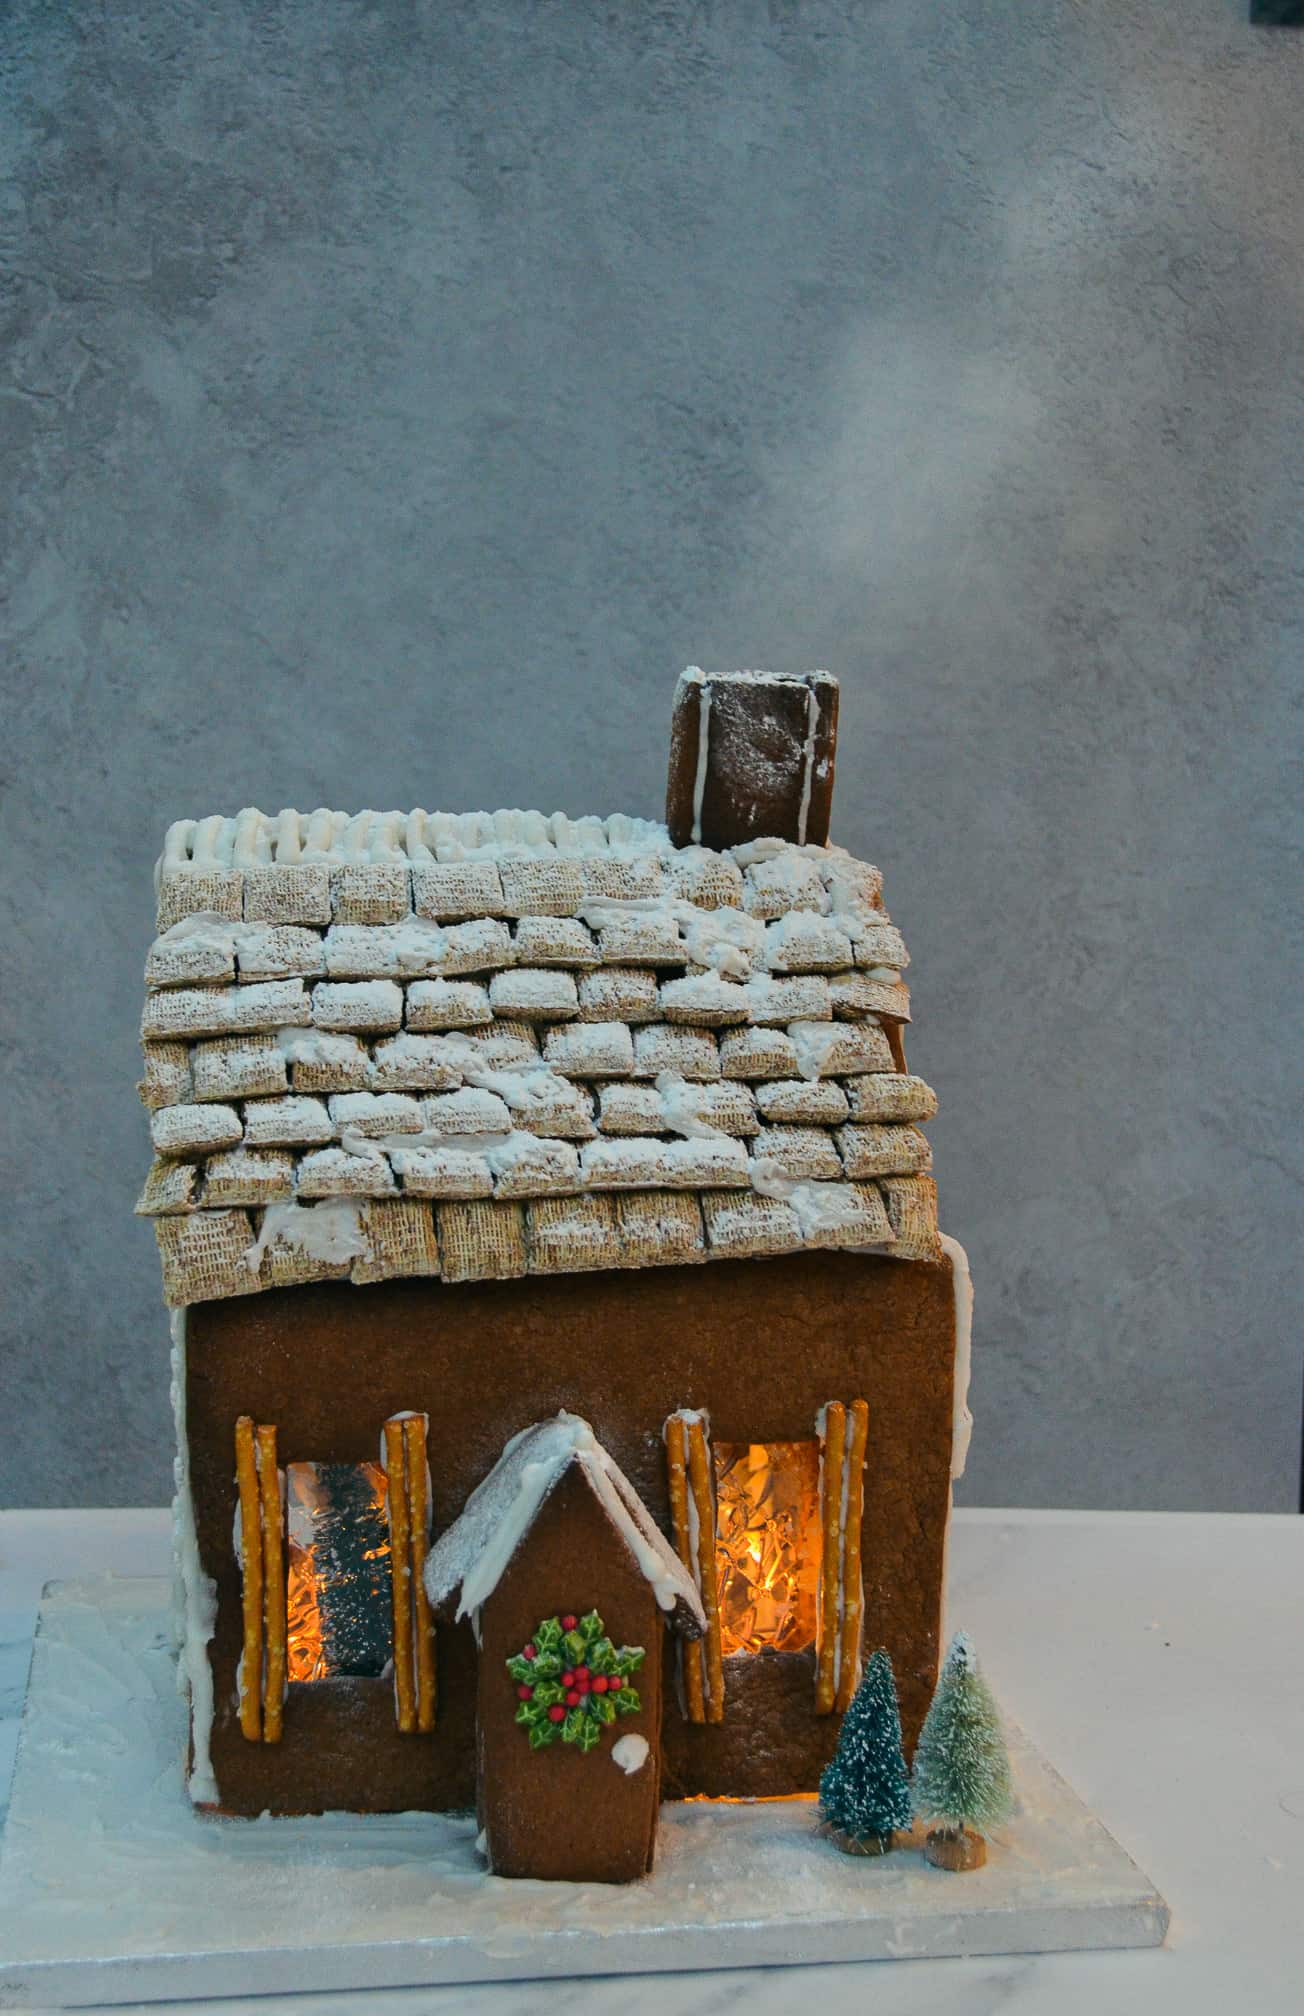
Making a gingerbread house is such a classic Christmas activity but I’d actually never made one! I knew if I made one I wanted to go ALL out and this year I finally took the plunge. And I loved it!! It was so fun, and honestly would be the best afternoon activity in front of a good Christmas film. I made my gingerbread cottage by myself, but it’d be so fun to make with little ones too! I’m calling mine a cottage as I went for a ‘thatched’ roof!
I’ve got loads of tips below to help you make and assemble the gingerbread cottage, as well as progress photos and a timelapse Instagram reel here. Of course you can be creative with your gingerbread cottage and you don’t need to follow my steps to the letter, and I’ve given some alternative suggestions below to help guide you! So let’s get going!
Key Ingredients You’ll Need
- Gingerbread – Of course, the full recipe for my gingerbread is below! It’s a slight variation on my usual gingerbread biscuit recipe, to make it sturdier! Ideally you want to make this the night before you plan to make your gingerbread cottage, or at least a good few hours before, so its completely cool.
- Royal Icing – Royal icing acts as a glue when building a gingerbread house as it sets hard! Conveniently it can also double up to look like snow. You can either buy royal icing sugar that you mix with water, or make it yourself by mixing egg whites into regular icing sugar.
- Decorations – The world is your oyster here! But sprinkles, mini shredded wheat (if you want to make a ‘thatched roof’ and little Christmas trees are a great start!

How to make a Christmas gingerbread cottage
Making a gingerbread house or cottage may seem like a daunting task, but once you break it down into steps, it’s so achievable! I’ve got a template for you to download below, so you can cut out the gingerbread pieces exactly, and lots of photos to help. But remember, a gingerbread house is meant to look higgledy-piggledy. I mean its a house made of sweets! If it’s a little wonky or the roof isn’t quite the right size; its FINE. Your royal icing will become your best friend as you glue it together, and a liberal dusting of icing sugar can fix many sins!!
Baking the gingerbread
The gingerbread itself is a really simple recipe – you just rub cold butter into the dry ingredients until it resembles breadcrumbs (like you would when you’re making shortcrust pastry). Then whisk in the sugar, and then the eggs and golden syrup. And then chill for about 15 minutes.
To create the dough I tweaked my classic gingerbread biscuit recipe by first; reducing the butter so that the gingerbread shapes were sharper. And also reducing the golden syrup slightly, so the dough had less moisture – resulting in a harder biscuit. The gingerbread still tastes delicious, but is muchh easier to construct with!
Download the Christmas Gingerbread Cottage template here
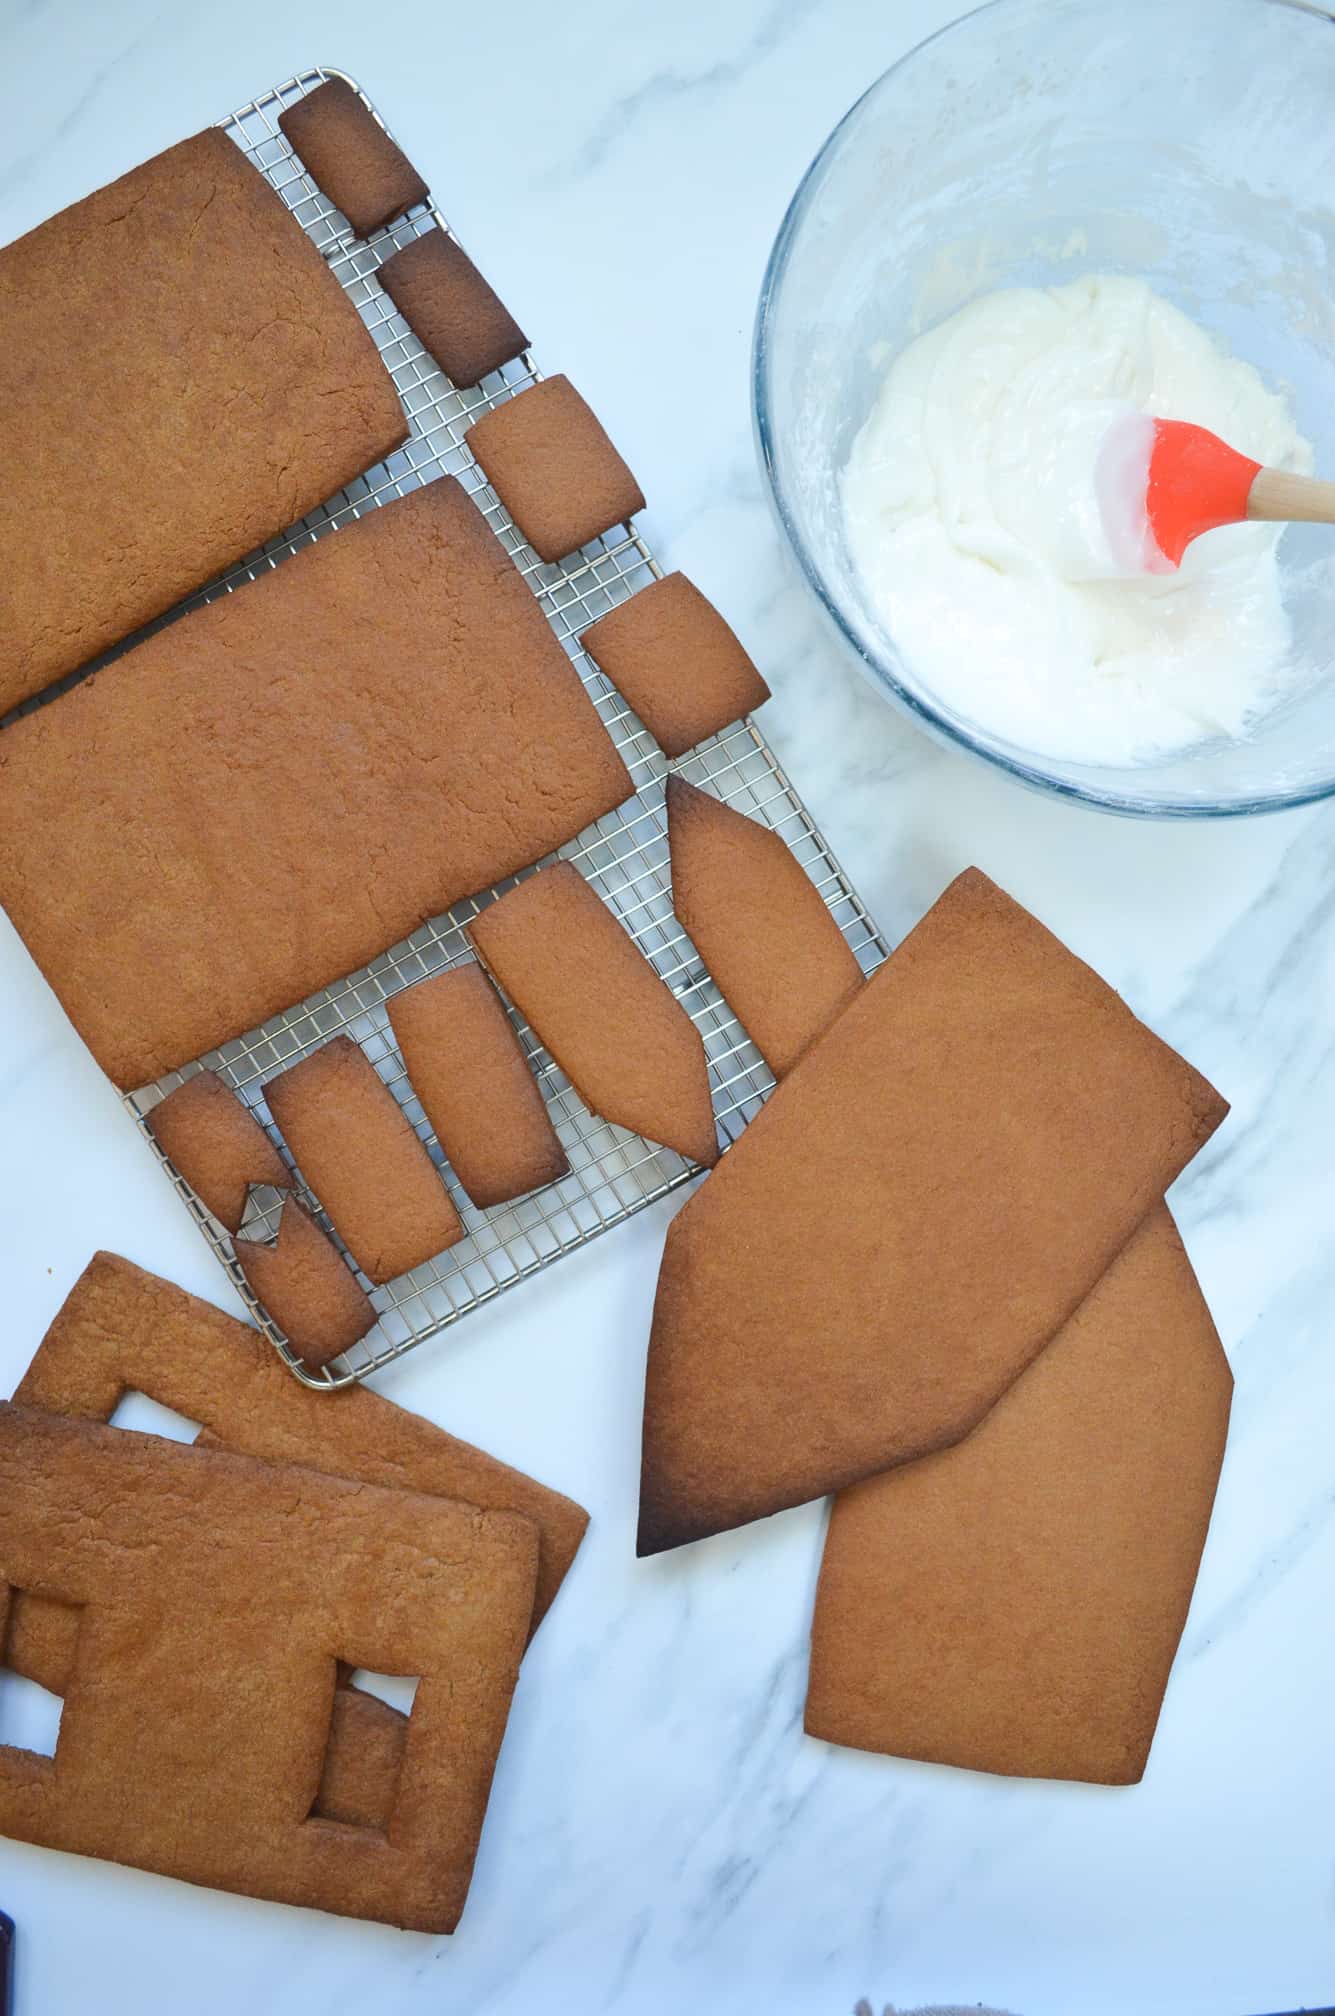
So once your gingerbread dough has chilled, you can then roll it out and cut out all your shapes. Ideally you really want to then chill the gingerbread dough shapes out again, so that they don’t spread too much in the oven! The more they spread, the harder it will be to construct your cottage as the shapes won’t be as sharp. So try not to skip that second chill! Shapes wise, you will need;
- 2 x front pieces
- 2 x side pieces
- 2 x roof pieces
- 1 x front porch piece
- 2 x side porch pieces
- 2 x roof porch pieces
- 1 x back door piece
- 2 x regular chimney pieces
- 2 x cutout chimney pieces
Once baked, you need to leave the gingerbread to cool completely. I found it easiest to bake the gingerbread shapes the night before I planned to construct the cottage. But if you do decide to do that, just make sure you place them in air-tight containers overnight!
Decorating the Christmas gingerbread cottage
First of all you’ll need to make up a batch of very stiff royal icing. This is going to act as our glue when assembling the gingerbread cottage, but will also be used to attach all the decorations. You can either make royal icing, by buying royal icing sugar and mixing with water. Or, you can make it by mixing regular icing sugar with fresh egg whites (or powdered egg/vegan alternative) – doing it this way is actually much cheaper as you can buy larger packs of icing sugar!
Now you can start decorating your pieces. It’s SO much easier to decorate the pieces individually before assembling the whole gingerbread cottage, as you can lay everything down flat! Again, you can totally decorate your gingerbread cottage however you want, but if you want some guidance, read on!
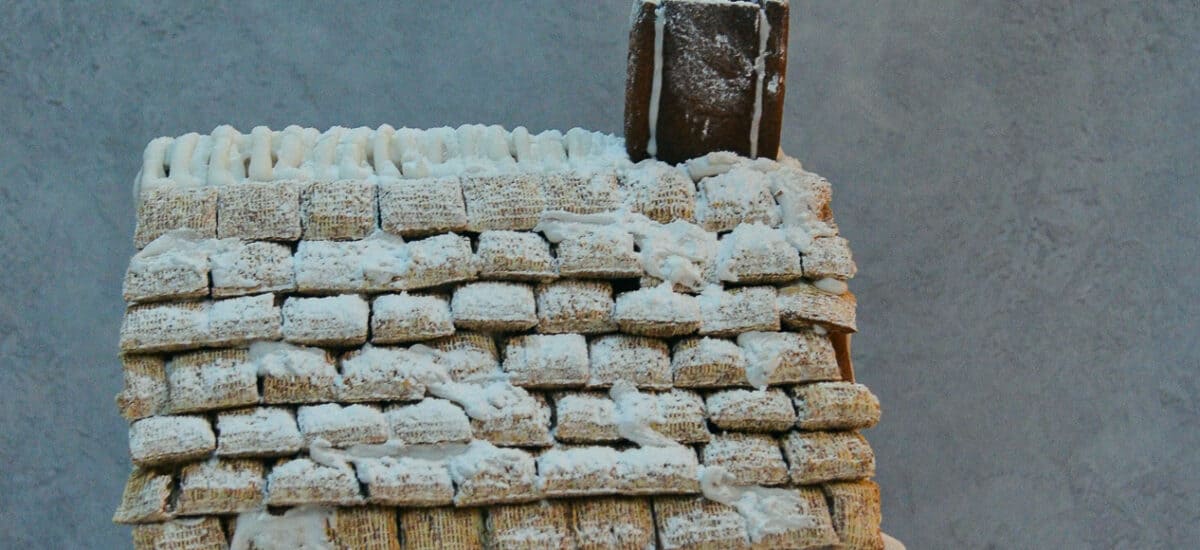
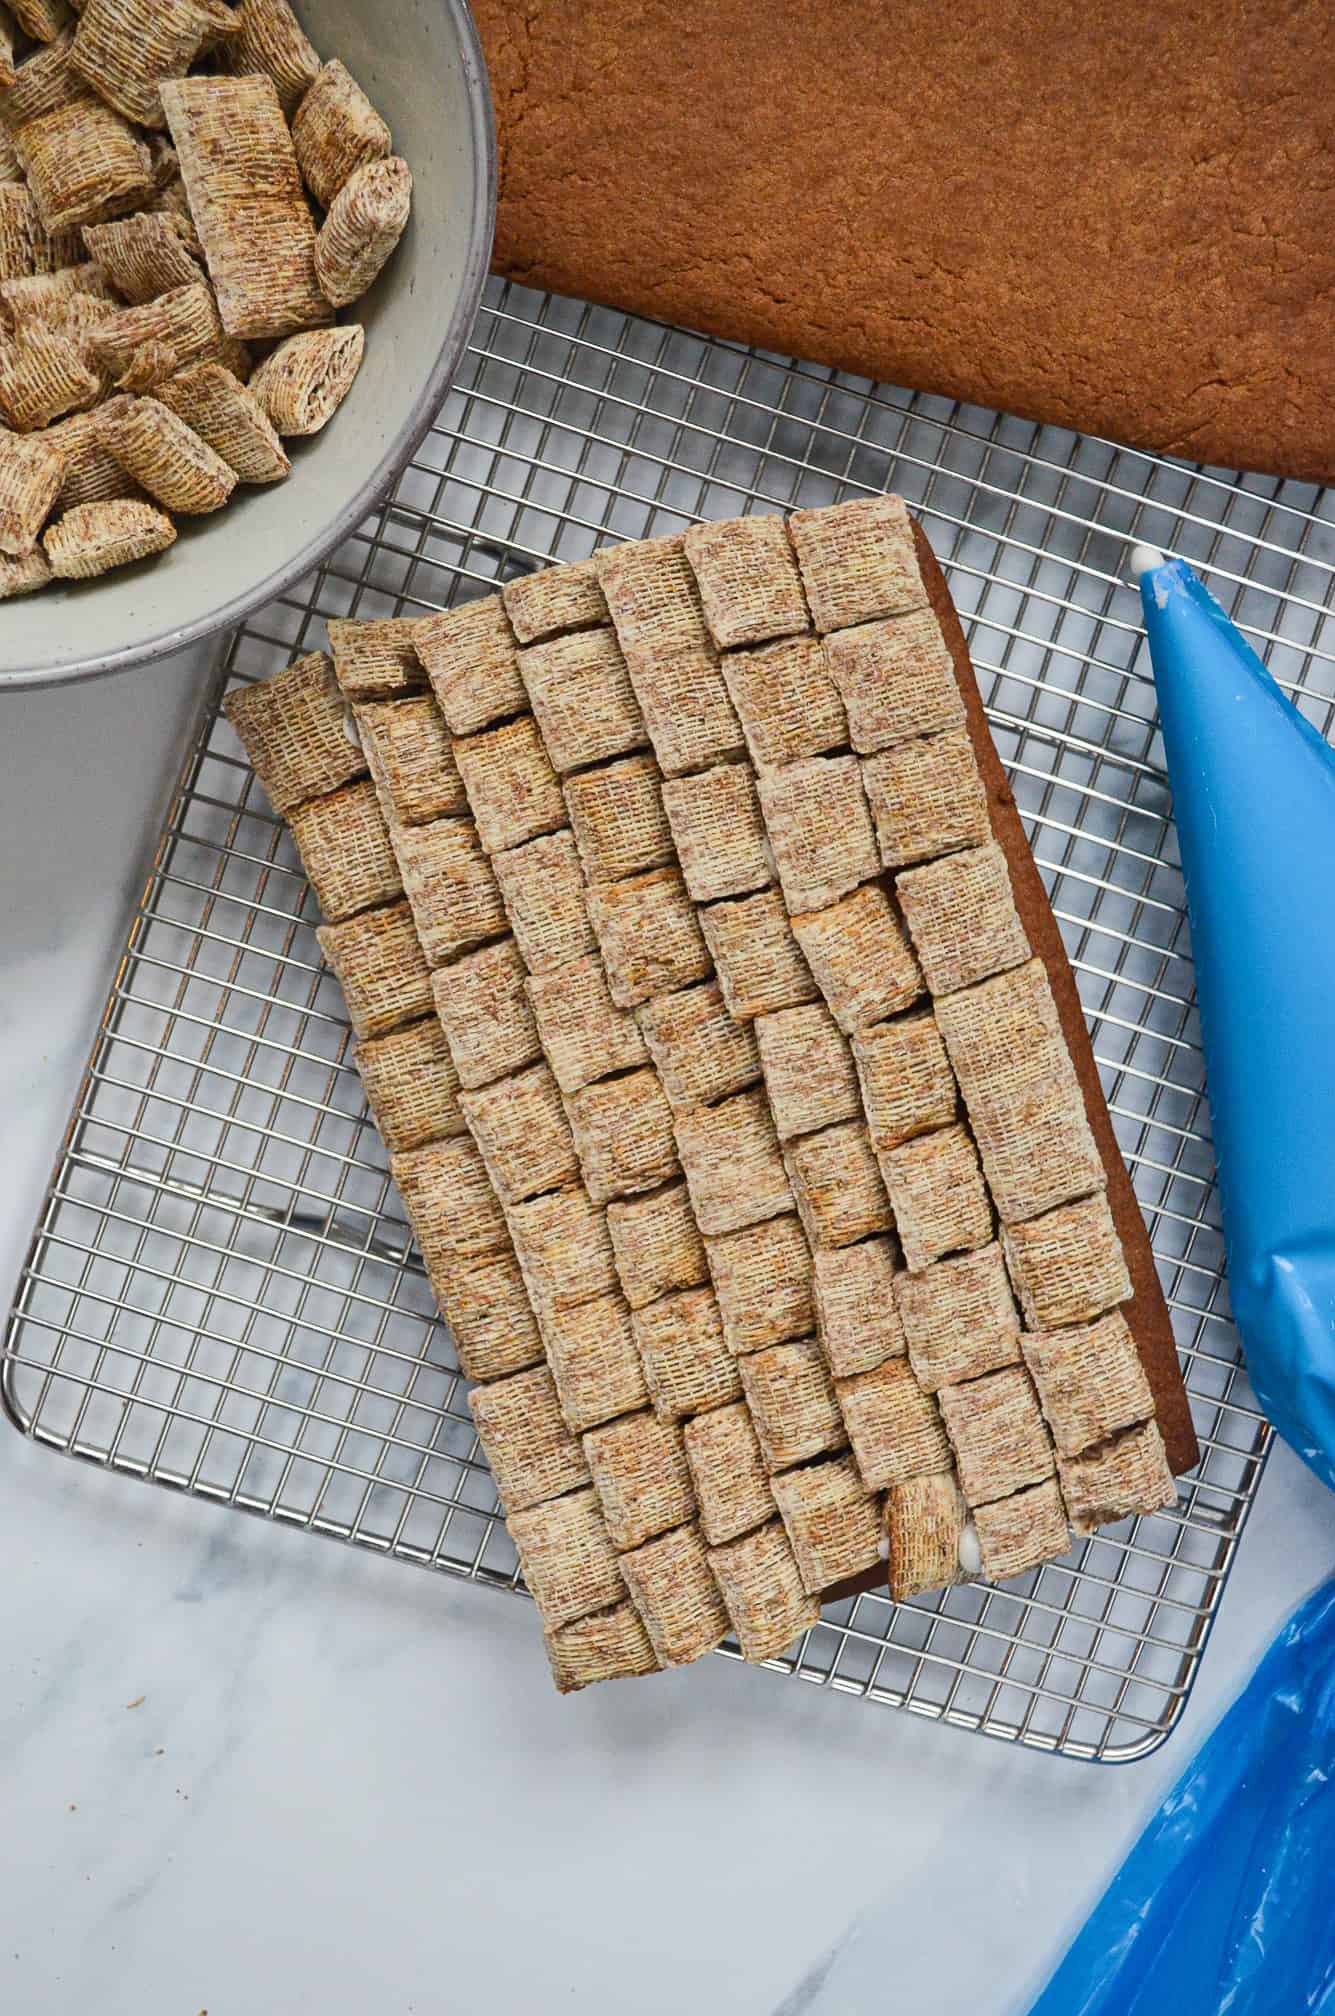
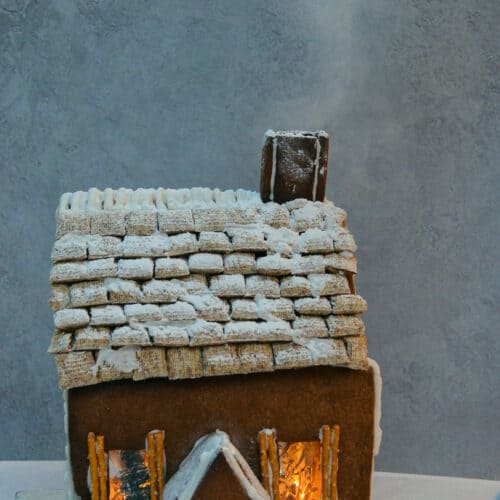
Making a thatched gingerbread roof
For the ‘thatched’ roof, I used the royal icing to stick on mini shredded wheat cereals, overlapping them slightly as I went. I started with the bottom row first, and then worked upwards. I also tried to alternate the rows a little, so the joins weren’t all in a straight line – like how you see bricks or tiles laid. This is a little time consuming, but decorating a gingerbread cottage is definitely a marathon not a sprint!
If you want a sleeker (and tastier!) look, you could replace the mini shredded wheat cereals for chocolate buttons!
Making the wreath for the gingerbread porch
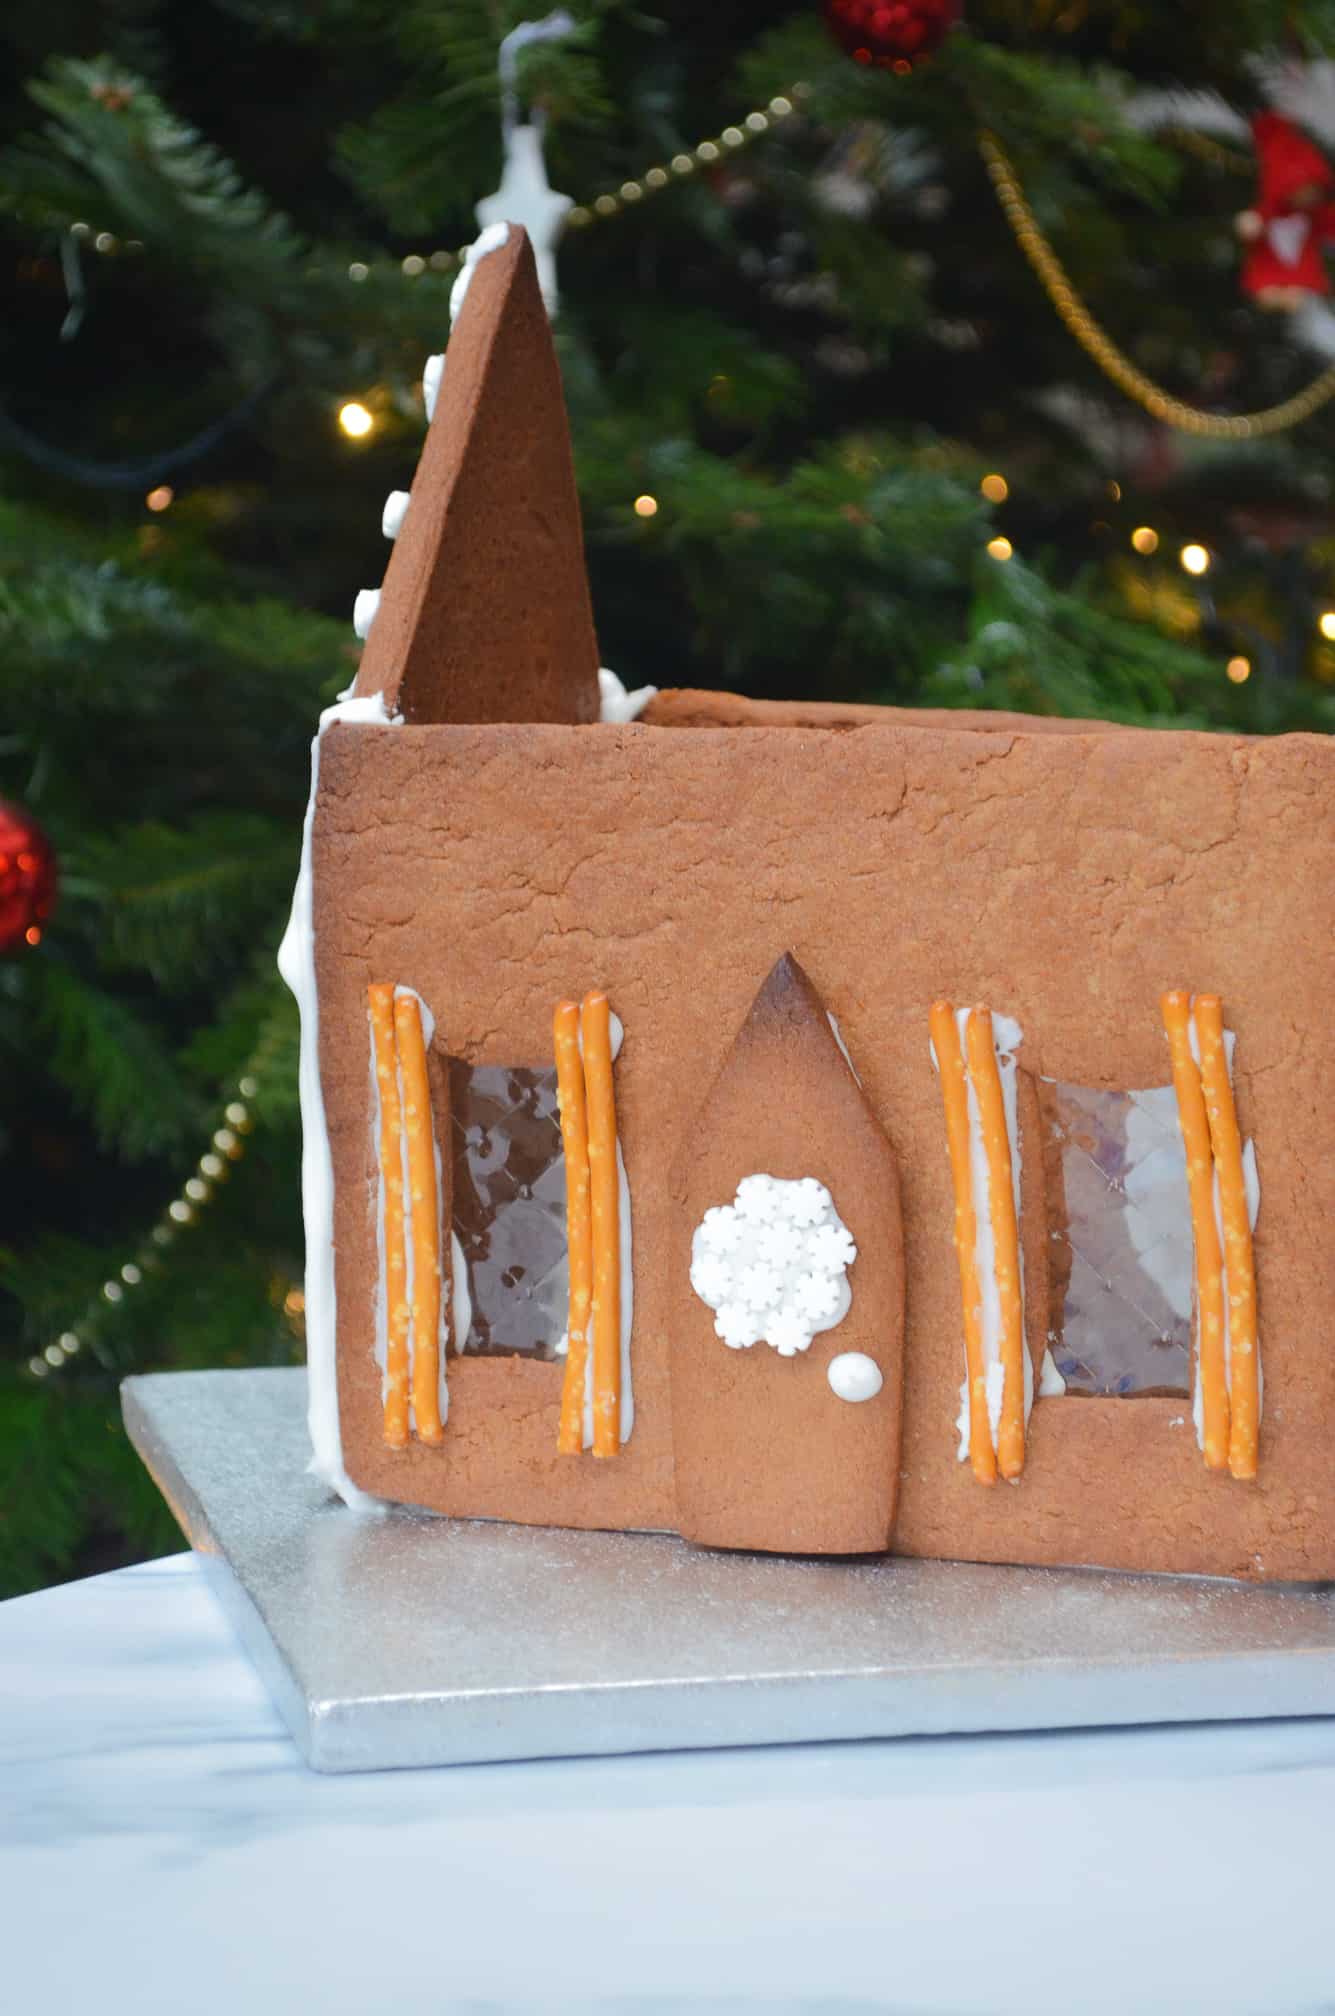
The porch wreath is one of my favourite parts of the gingerbread cottage, and it was SO simple to make! I got some holly & berry sprinkles, and then using the royal icing stuck them onto the front of the porch. You could make any kind of ‘wreath’ with sprinkles, or even fondant icing! I also created a snowflake wreath on the ‘back’ door!
Making the stained glass windows
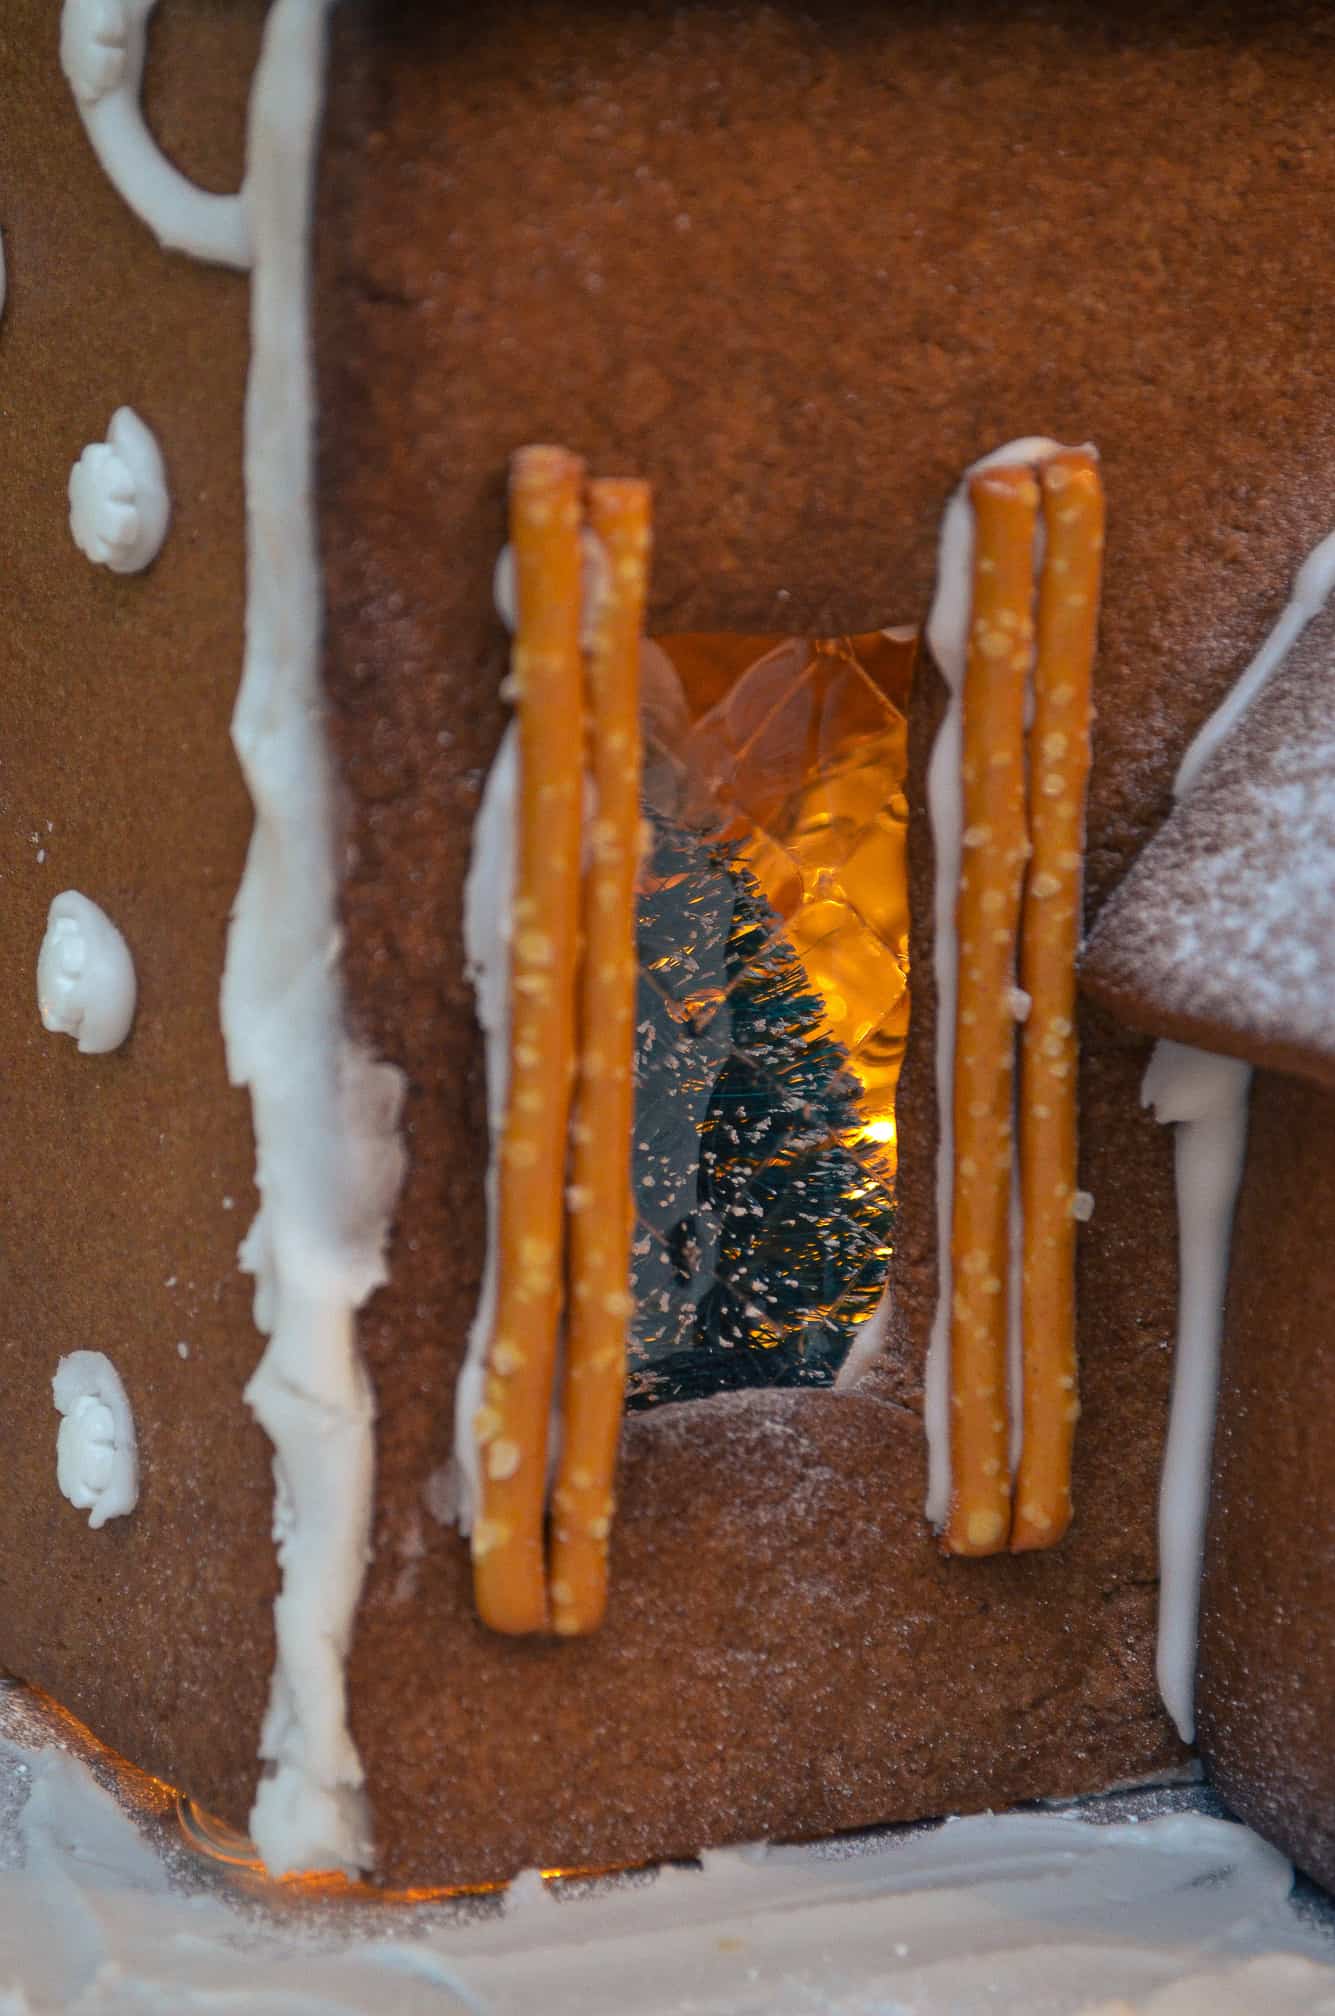
Honestly, I LOVE how this turned out! So simple but so effective! Usually you would fill the window holes with crushed boiled sweets, to cook in the oven to melt them down, and then let them harden again. It means you can fill any window shape and have multiple colours if you want! But it does make the window look ‘frosted’, and I really wanted to be able to see into my gingerbread cottage’s window – mainly as I wanted to put a mini Christmas tree inside!!
So, I used gelatine leaves/sheets. The faint lines running through the sheets look so effective as windows, and of course you can see right through! To add them to the windows, I simply piped a little of the royal icing around each window on the inside of the cottage, stuck on the gelatine sheet and then left to set! So cute! If you don’t want to use gelatine, you could just leave the windows empty or go back to the classic boiled sweet method.
Making the window shutters
I wanted something to really help the windows stand out and what better than cute little window shutters! They’re made from thin pretzel sticks which I found in Marks & Spencer – though they definitely sell them elsewhere too! I stuck them onto the edges of the windows with a thin line of royal icing – so not only do they look cute but they’re delicious too! And once you’re done with the gingerbread cottage, you can use the remaining pretzel sticks to make my Candy Pretzel Rods!
Decorating the sides/back of the cottage
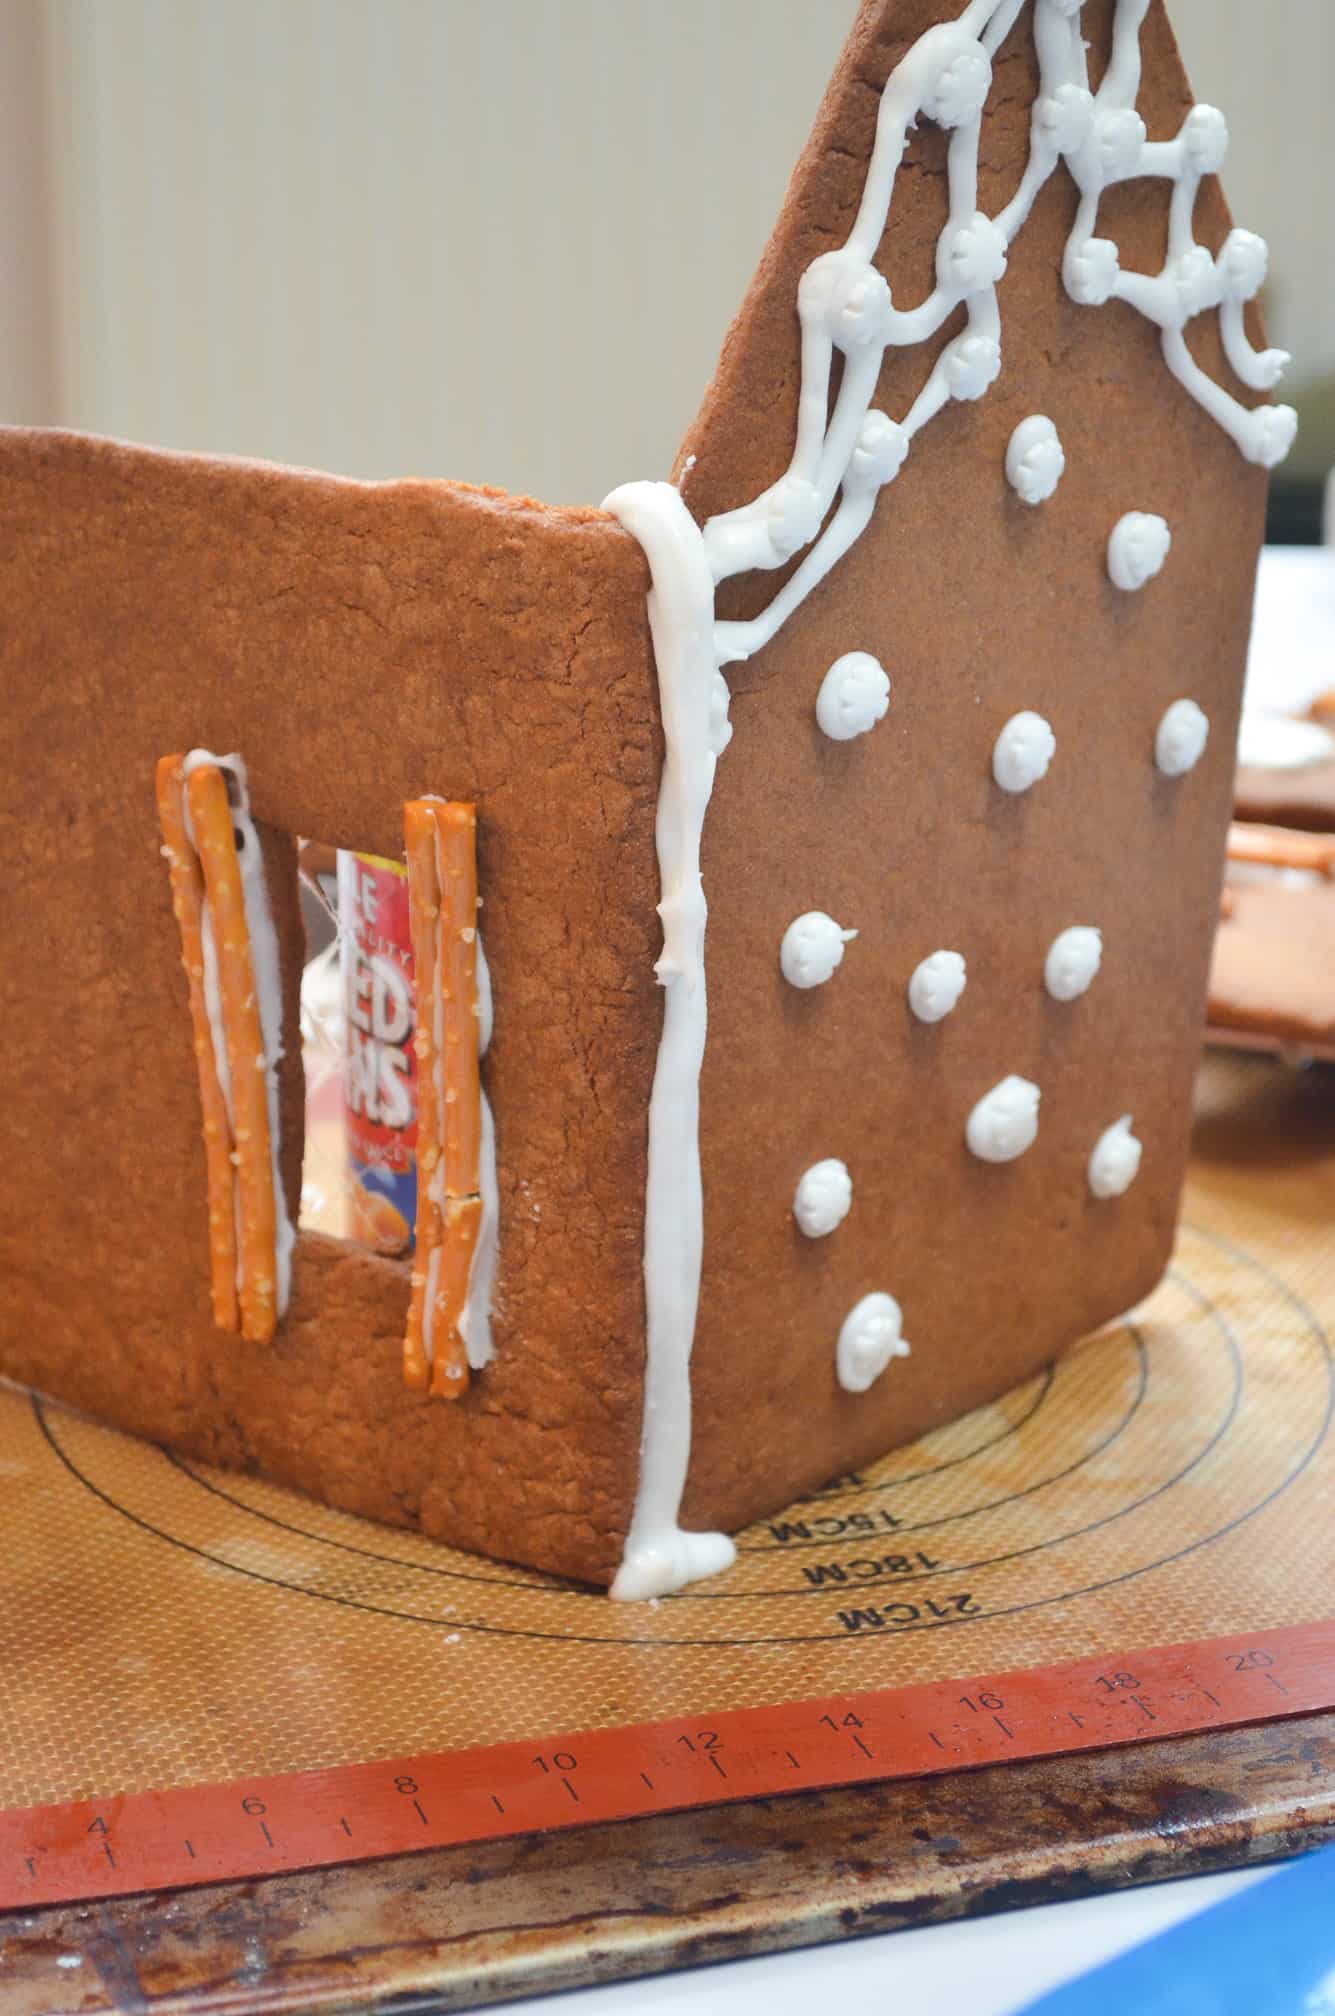
For the sides of my cottage I kept it fairly simple, and just decorated with some piped royal icing and snowflake sprinkles. Again for the back of the cottage I also kept that simple, and aside from the snowflake wreath on the back door and the pretzel window shutters, I didn’t add anything else. But of course, you can add any additional decorations you want! Get creative!
Assembling the Christmas gingerbread cottage
Okay, so once everything is decorated we can start assembling! You want to do this in the order I’ve detailed below to give your cottage the best stability. And, please please please don’t skip the ‘setting’ time. You need to leave the cottage alone in between assembly so it has a chance to dry and set. Otherwise your cottage will likely collapse, and we don’t want that after all your hard work!
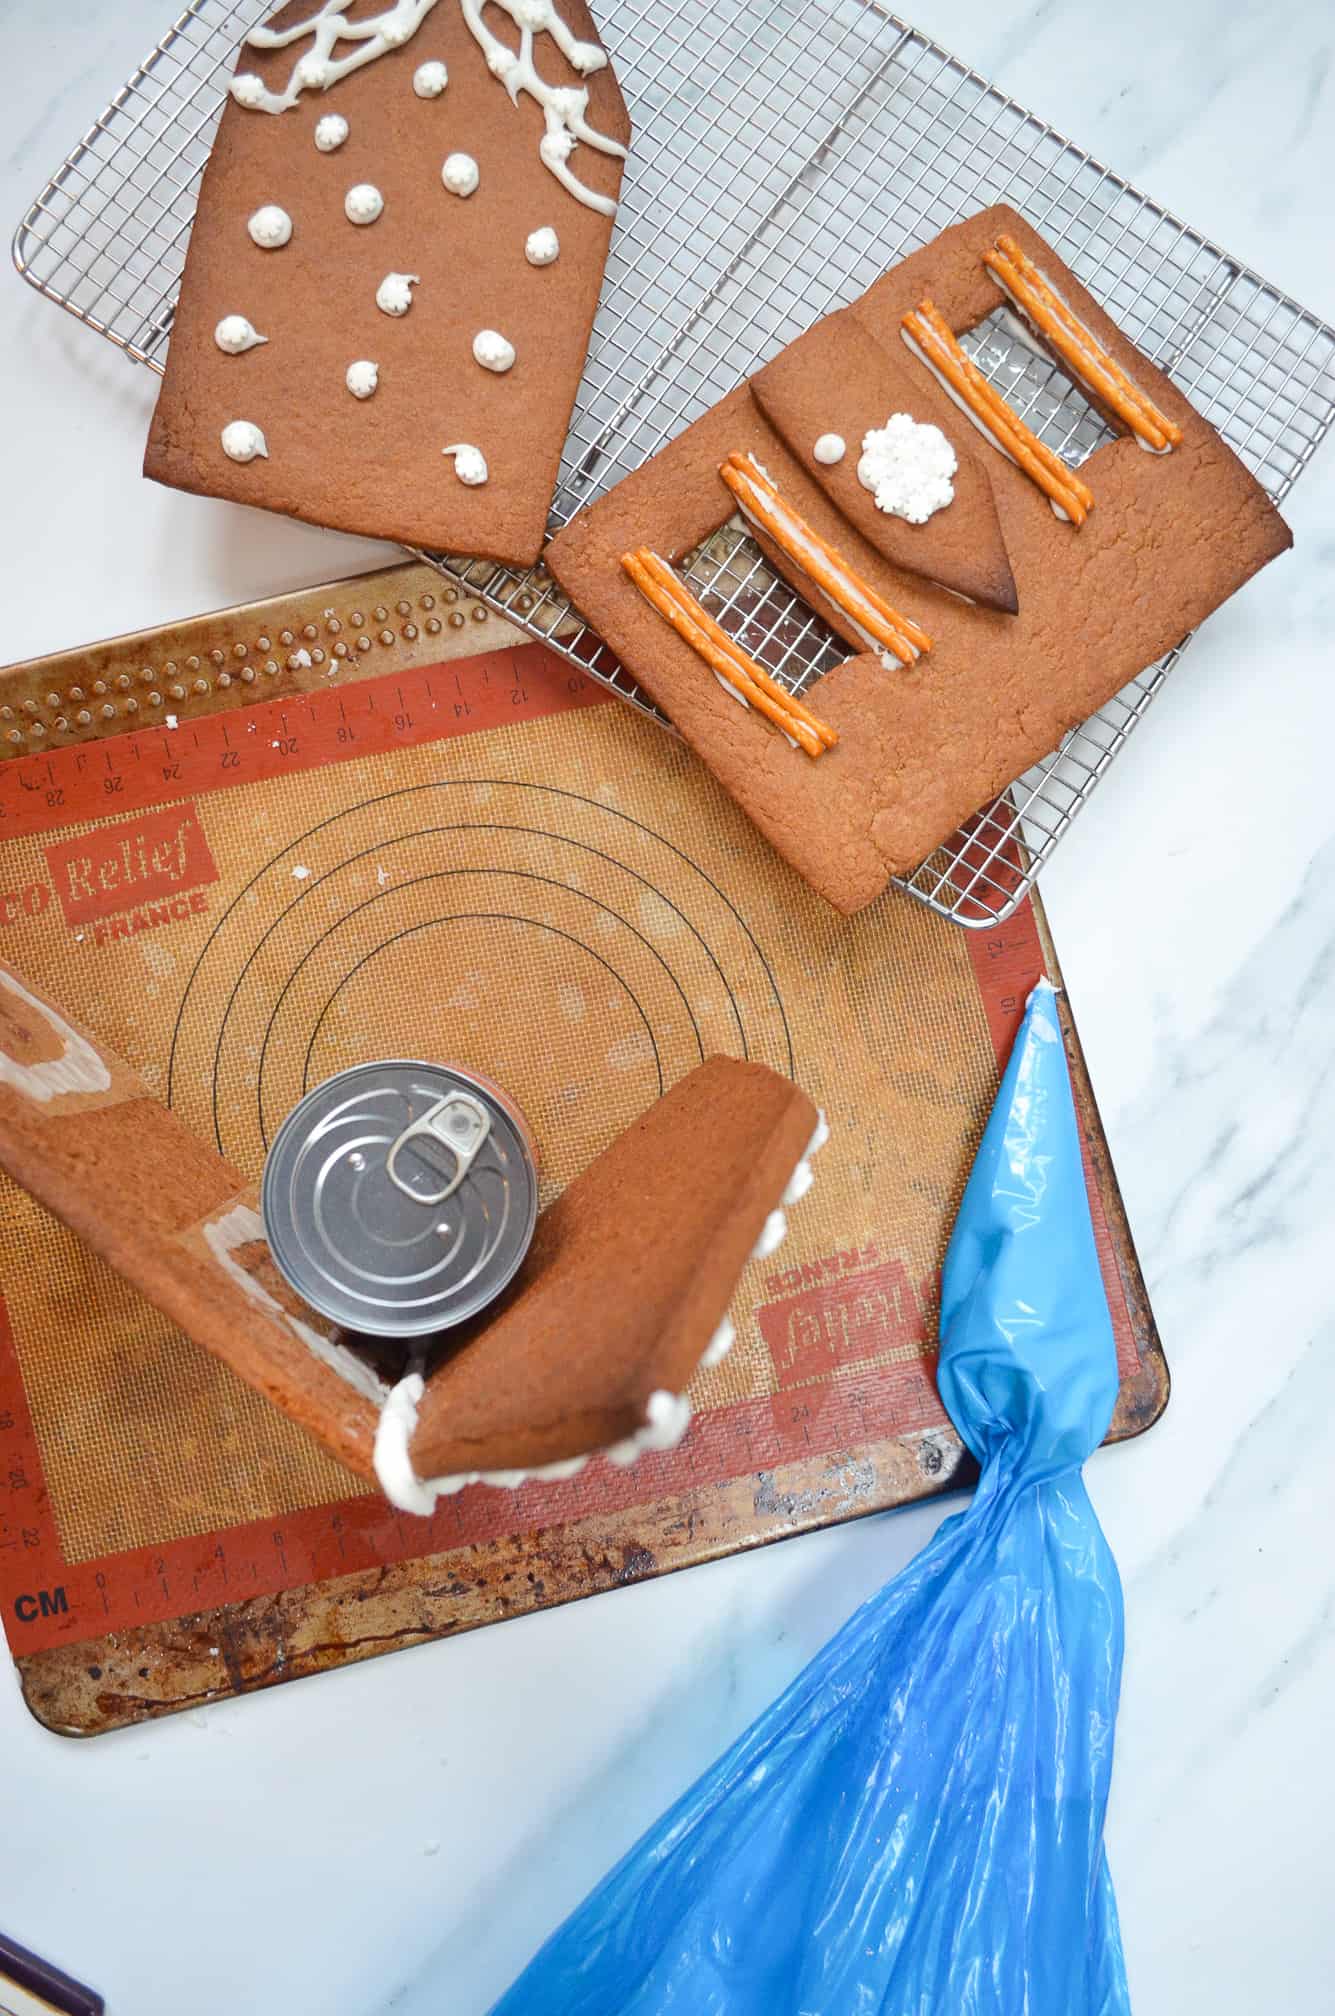
- The first step is to ‘glue’ together one of the sides of the cottage and the front piece of the cottage. Do this by piping a thick line of royal icing down one of the pieces, and holding them together for about a minute until it feels more stable. You can then place a tin or a jar (or anything really) ‘inside’ the cottage, to give it some support while you then pipe another line on the inside and outside at the join.
- Then you can add the back of the cottage. Again, pipe a thick line down the side of the back piece, and then secure against the exposed side piece. You can add another can or jar inside if you want to give this corner some more support as well. And then just pipe another line on the inside and outside at the join. Remember to make sure you are glueing the pieces the right side around – so you don’t end up with your beautifully decorated pieces ‘inside’ the cottage.
- Then you can add in the final side piece, piping a thick line down both exposed edges of the back and front of the cottage. Again, pipe another line on the inside and outside of both joins and then leave to set for a good hour. This will help to give a solid foundation for your roof to sit on.
- While you’re waiting for the foundations of the cottage to set you can assemble your porch and chimney. For the chimney, simple pipe royal icing down the sides of each piece and stick together – starting with two sides first, as above. Then set aside to dry and set.
- For the porch, stick together one of the sides and the front first (like above). Then attach the remaining side and leave to set for 20 minutes. Then attach the roof, by piping royal icing on the top of the exposed sides and front – then leave to set until needed.

- Adding the roof is probably the trickiest part, so if you can rope someone into helping you, I would go for it! You want to pipe a thick line on all the exposed edges at the top of the side, front and back pieces. Then attach one of the roof pieces (choose your best one, as this will be the front!), resting it on top of the front piece and pressing it into the royal icing so it sticks. Hold it there for a few minutes, before moving onto the final roof piece.
- Pipe some more royal icing at the top of the roof piece already attached to the cottage, so your final roof piece has something to stick to. Then place it on carefully, pressing it into the royal icing so it sticks. Again, hold it there for a few minutes.
- At this point, if you can see any gaps between any of the joins, pipe royal icing into them to fill. You want it to be as secure as possible, so the more royal icing the better – just think of it as ‘snow’!
- Finally, using more royal icing attach the chimney onto the roof, and the porch onto the front piece.
- Then leave to dry and set – or smash into it completely to eat! The choice is yours! If you are planning on picking up your gingerbread cottage to place lights inside like I did, I would leave it to set for at least an hour.
Tips & Tricks
Yes!! Absolutely yes. I know some gingerbread houses are made so hard that it makes them practically inedible, but I don’t see the point in that. You can of course make this purely to be a decorative item in your home, but ultimately its a bake! And you want it to be as delicious as it is beautiful!
Honestly, I would pop them back in the oven for a few minutes – keeping a very watchful eye. Or I would start again. Trying to construct a gingerbread house with a soft gingerbread is going to make your life so much harder than it needs to be!
If thats the case, your icing isn’t thick enough! It needs to be super stiff so it can be used as a glue. So I would pour it all back into your mixing bowl, and add more royal icing sugar until you have a stiffer consistency.
This has been a super wordy post, but I think it’s needed for a baking task like this! Creating a Christmas gingerbread cottage is not a simple undertaking, and I really want you to succeed because it can be SO fun! Even if you just have it out as a decoration all holiday season, or if you smash into it and eat it moments after assembly. And the gingerbread really does taste delicious!! Please let me know how you get on! 🙂
You can watch my Instagram reel here, where I show each step!
You may also like:
How To Make A Christmas Gingerbread Cottage
Ingredients
Gingerbread
- 700 g plain flour
- 2 tsp bicarbonate of soda
- 4 tsp ground ginger
- 2 tsp ground cinnamon
- 200 g unsalted butter chilled & cubed
- 350 g soft light brown sugar
- 2 large eggs
- 105 ml golden syrup
Royal Icing
- 525 g icing sugar (or royal icing sugar)
- 2 large egg whites (or if using royal icing sugar, approx. 75ml water)
Decorations
- 180 g mini shredded wheat cereals
- 4 gelatine leaves/sheets
- 16 pretzel sticks
- assorted sprinkles holly, berries, snowflakes
- icing sugar for dusting
Instructions
- For the gingerbread: Place the flour, bicarb, ginger, cinnamon into a very large bowl. Then rub in the cold cubed butter using your hands until it resembles breadcrumbs. Then whisk in the sugar until combined. In a separate bowl, lightly beat the eggs and golden syrup together and then pour into the dry mixture. Using a silicone spatula mix the wet ingredients in with the breadcrumb mixture until it clumps together. Tip out the dough onto a lightly floured surface, and knead into two balls, flatten into discs, wrap in clingfilm and place in the fridge for 15 minutes to firm up. Meanwhile, preheat the oven to 180C/160C Fan/Gas Mark 4 and line three baking trays with baking paper.
- Dust your work surface lightly with flour, and then roll out one disc at a time using a rolling pin. Using the template (linked in the notes section) cut out all the pieces needed, and place onto your prepared baking trays with space between – keep the front pieces together on one tray, the roof & side pieces together on another tray and the porch & chimney pieces together on a final tray. Then chill for at least 15 minutes. Bake the front pieces for 20 minutes, the roof & side pieces for 22 minutes and the porch & chimney pieces for 17 minutes – or until all are a deep golden brown. Place all the pieces onto cooling racks and leave to cool completely – can be done overnight, but place them into air-tight containers first.
- To make the royal icing: In a large bowl, pour in the icing sugar (or royal icing sugar if using) and add the two egg whites (or water, if using royal icing sugar). Whisk together using a manual whisk until it is a smooth, and very stiff paste. Place 3/4 of the icing into one piping bag, and cut off the end to make a medium size hole. Then place the remaining 1/4 into another piping bag, and cut off the end to make a small hole.
- To decorate the gingerbread pieces: For the thatched roof, take one of the roof pieces and starting at the bottom (the longest side), begin piping royal icing (from the bigger bag) onto a mini shredded wheat cereal and sticking onto the gingerbread roof piece. Continue along the row until the end, and then begin a new row on top, placing the cereals so they're slightly overlapping the row below. Try to alternate the placing of the cereals too, so the joins aren't all in a straight line down (like how bricks/tiles are laid). Continue this till the entire roof is covered, and then repeat the process on the remaining roof piece. Then set aside to dry and set.
- Next take the front porch piece, and using the royal icing from the smaller bag, pipe a small circle for your wreath. Then add holly & berry sprinkles on top, using the royal icing as glue. Repeat the same process for the back door, this time using the snowflake sprinkles instead. Set both aside to set.
- For the windows, take the front and back pieces and lay them down, so the 'inside' of the cottage is facing up. Pipe royal icing (from the bigger bag) around the edges of the window holes and then place the gelatine leaves/sheets down using the royal icing to help glue them into place – these are your 'glass' windows. Then turn the front and back pieces over so the 'outside' of the cottage is now facing up, and press down slightly to help the gelatine leaves/sheets stick. Then, using the royal icing from the smaller bag, pipe two thin lines on either side of each window, and press in two pretzel sticks on either side to act as 'window shutters'. Then set aside to set.
- Finally, using the royal icing from the smaller bag and your remaining sprinkles, decorate the sides of the cottage. Then set aside to set.
- To assemble: The first step is to 'glue' together one of the sides of the cottage and the front piece of the cottage. Do this by piping a thick line of royal icing (from the bigger bag) down one of the pieces, and holding them together for about a minute until it feels more stable. You can then place a tin or a jar 'inside' the cottage, to give it some support while you then pipe another line on the inside and outside at the join. Then add the back of the cottage. Again, pipe a thick line down the side of the back piece and then secure against the exposed side piece. You can add another can or jar inside if you want to give this corner some more support as well. And then pipe another line on the inside and outside at the join. (Remember to make sure you are glueing the pieces the right side around – so you don't end up with your beautifully decorated pieces 'inside' the cottage.)Then add in the final side piece, piping a thick line down both exposed edges of the back and front of the cottage. Again, pipe another line on the inside and outside of both joins and then leave to set for at least one hour.
- Meanwhile, assemble the chimney by piping a thin line of royal icing down the sides of each piece and sticking together – starting with the two sides first, as above. Then set aside to dry and set. For the porch, stick together one of the sides and the front first (like above). Then attach the remaining side and leave to set for 20 minutes. Then attach the roof, by piping royal icing on the top of the exposed sides and front – then leave to set until needed.
- Then add the roof, by piping a thick line (from the bigger bag) on all the exposed edges at the top of the side, front and back pieces. Then attach one of the roof pieces (choose your best one, as this will be the front!), resting it on top of the front piece and pressing it into the royal icing so it sticks. Hold it there for a few minutes, before moving onto the final roof piece. Pipe some more royal icing at the top of the roof piece already attached to the cottage, then place it on carefully, pressing it into the royal icing so it sticks. Again, hold it there for a few minutes. At this point, if you can see any gaps between any of the joins, pipe royal icing into them to fill. Finally, using more royal icing attach the chimney onto the roof, and the porch onto the front piece of the cottage. Then leave to dry and set for at least an hour.
- Finally, dust with icing sugar to create snow, and add any further decorations you like!