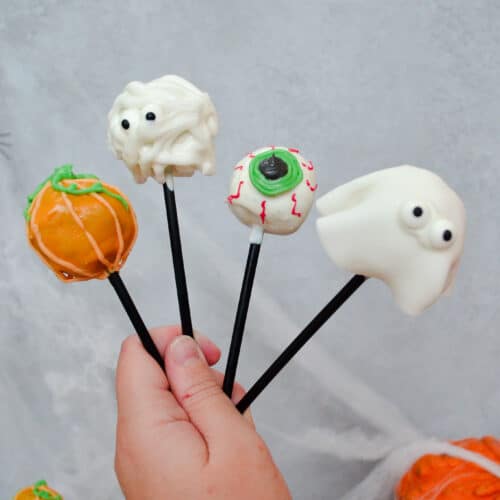
Halloween Cake Pops
Halloween is all about the cute and spooky treats, and these Halloween Cake Pops will be the star of your party spread! Moist chocolate cake, wrapped in chocolate shells that look like ghosts, mummies, eyeballs and pumpkins!
Ingredients
Cake Balls
- 400 g chocolate cake baked and cooled
- 40 g unsalted butter room temperature
- 40 g icing sugar
- 1/4 tsp vanilla extract
White Coating (Mummy, Eyeball, Ghost)
- 225 g bright white candy melts
- 1 tbsp vegetable/sunflower oil
Orange Coating (Pumpkin)
- 75 g orange candy melts
- 1 tsp vegetable/sunflower oil
Decorations
- 180 g royal icing sugar
- edible eyes
- orange gel food colouring
- green gel food colouring
- black gel food colouring
- red gel food colouring
- 80 g white fondant icing
Instructions
- For the cake balls: Make the box cake mix as per the instructions, leave to cool and keep in an air-tight container overnight. The next day, crumble 400g of the cake into a large bowl. Then in a separate small bowl, using a wooden spoon or silicone spatula, beat together the butter, icing sugar and vanilla until you have a smooth buttercream. Then stir this into the crumbled cake, until it just comes together in your hand.
- Using your hands make 20 balls, approx. 30g each, place on a baking tray and then into the freezer for 20 minutes to harden. Then take balls out, and roll between your hands to perfect the ball shape, then place back into the freezer for five minutes.
- For the coating: While the cake balls are on their second freeze, place the white candy melts and oil into a heat-proof jug and melt in the microwave in 30 second increments until melted. Stirring at each 30 second interval. Then remove the cake balls from the freezer. Take a cake pop stick and first dip it into the melted candy melts, and then insert into the middle of a cake pop. Then swirl the cake pop in the melted candy melts until fully covered, and then gently tap the stick on the edge of the jug to remove any excess. Set aside upright to set (you can use a leftover cardboard box, to stick the cake pop sticks into). Repeat the process until you have coated 16 cake pops. Then melt the orange candy melts and oil in another jug as above, and dip the remaining 4 cake pops. Set all aside to dry.
- To decorate the mummy cake pops: Mix the royal icing together with a dash of water in a large bowl. You need enough water to create a thick stiff icing paste, so add slowly as it can thin very quickly. Then place 60g of it into a piping bag, and cut off the end to create a small hole. Firstly, pipe two small blobs onto a white cake pop and press two of the edible eyes on until secure. Then pipe the icing in strips, randomly all across the cake pop, covering the eyes partially to give the 'mummy' look. Repeat the process on three more white cake pops, then set aside to dry.
- To decorate the pumpkin cake pops: Place 30g of the white royal icing into a small bowl, and colour with a small blob of orange food colouring. Then place into a piping bag and cut off the end to create a very small hole. Place 45g of the white royal icing into another small bowl, and colour with a small blob of green food colouring. Then place into a piping bag and cut off the end to create a very small hole. With the orange icing, pipe thin lines up the sides of an orange cake pop, to emulate the pumpkin ribs. Then using the green icing pipe the stalk and stem (don't use all the icing, as you need it for the eyeball cake pops). Repeat the process on three more orange cake pops, then set aside to dry.
- To decorate the eyeball cake pops: Place 30g of the white royal icing into a small bowl, and colour with a small blob of black food colouring. Then place into a piping bag and cut off the end to create a small hole. Place 15g of the white royal icing into another small bowl, and colour with a small blob of red food colouring. Then place into a piping bag and cut off the end to create a very small hole. Finally, cut a little more off the end of the green icing piping bag, to create a slightly larger hole. Using the black icing, pipe small circles in the middle of one side of a white cake pop, then pipe the green icing around this in circles to create the 'iris'. Then finally, using the red icing pipe very thin squiggly lines around the eye to emulate veins. Repeat the process on three more white cake pops, then set aside to dry.
- To decorate the ghost cake pops: Dust your work surface with icing sugar, and roll out the fondant icing until quite thin. Then cut four circles out with a 10cm cookie cutter. Dab a little water onto the top of the remaining 4 white cake pops, and drape a circle of fondant over each cake pop. Pleat the sides of the fondant, to give each cake pop more of a ghost-like shape. Finally, pipe two blobs of the remaining white icing and press in the edible eyes. Then set aside to set.
Notes
Cake pops are best served on day of making.
Cake pops will keep in an air-tight container for 3-4 days, though the colouring in the edible eyes may bleed a little.